
How to Put a Diaper On So It Does Not Leak

Nobody teaches this. You are handed a baby and a diaper and you work it out, and most of what goes wrong afterward traces back to two or three steps that were never explained.
A diaper that does not leak has two seals: one at the waist and one at each leg. Everything below is about building both of them, in an order that works.
Before you start
Have everything within arm’s reach: the fresh diaper, wipes, anything else you use, and somewhere to put the used one. This is not tidiness advice.
Once your baby is on a changing surface, keep a hand on them, and never turn away or step back for something you forgot. That is the reason to set up first. Babies roll earlier than parents expect and it happens once, without warning.
Open the fresh diaper out flat before you begin so you are not fighting packaging with one hand.
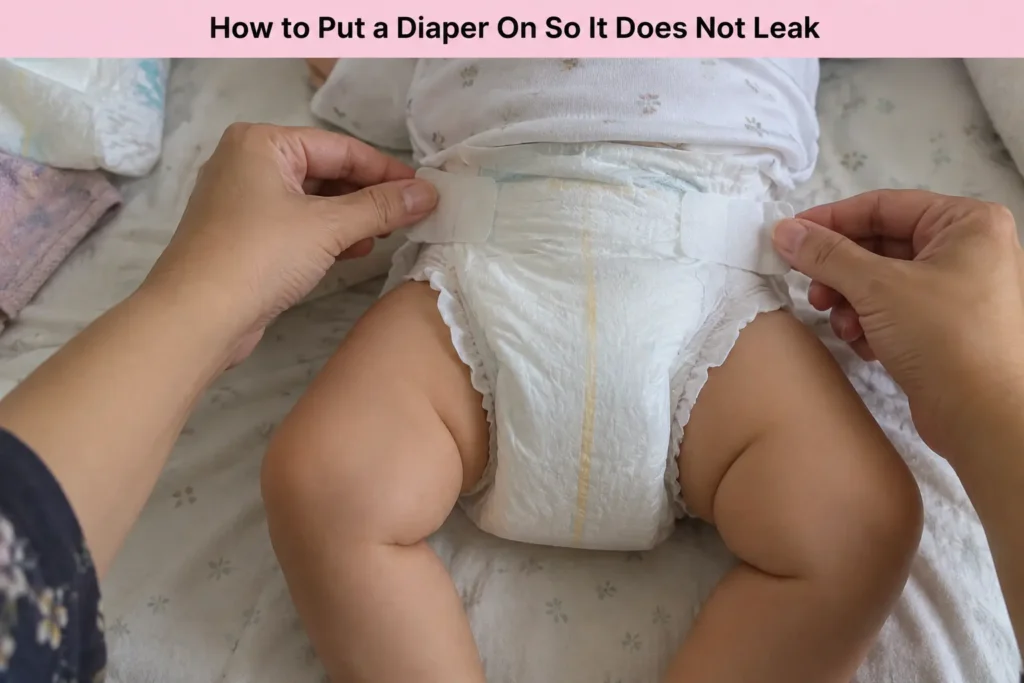
“In my experience, most diaper leaks come down to how the diaper is fitted rather than the diaper itself. I’ve found that getting the front panel into the right position, fastening both tabs evenly, keeping the waistband snug without overtightening, and pulling both leg cuffs fully outward makes the biggest difference. Once those two seals at the waist and legs are built properly, many leaks disappear without changing size or brand.”
The order that works
1. Slide the fresh diaper underneath, before you clean. With the used diaper still fastened, lift the baby’s bottom by the ankles or by rolling them gently to the side, and put the clean one in place under them. Then unfasten and clean. This means you are never holding a bare baby over an unprotected surface, which solves a common category of mess on its own.
2. Check which way round it goes. The tabs are at the back. The plain front panel goes at the front. This sounds too obvious to state and it is a very common early mistake, particularly at three in the morning.
3. Clean front to back. For girls, this direction matters and is worth being deliberate about.
4. Let the skin dry. A few seconds. This is the step everyone skips and it matters both for how the diaper sits and for the skin itself.
5. Bring the front panel up. Up to where it is meant to sit, which is higher than most people bring it. Just below the navel is the usual target for an older baby. For a newborn with the umbilical cord stump still attached, the front goes below the stump; newborn-size diapers have a notch cut for exactly that, which is covered in newborn vs size 1.
6. Position, if you have a boy. Point downward, toward the feet, before you fasten. Skipping this is the single most common cause of a leak that soaks the front and leaves the back dry, and diaper fit for boys covers why.
7. Fasten both tabs, symmetrically. Pull the back panel up first so it is where you want it, then bring each tab forward and fasten it at the same height on each side. Uneven tabs twist the whole diaper and open a gap on one side.
8. Check the tightness. You should be able to slide a finger or two comfortably inside the waistband. Tighter is not safer and it is not more absorbent; it just leaves marks and forces the leg cuffs flat.
9. Untuck both leg cuffs. This is step nine and it is arguably the most important one on the list. It gets its own section.
10. Smooth everything. Run a hand around the waist and both legs. Bunched material is a gap.
Step nine, in detail
The ruffled edges around each leg are a barrier. They are designed to stand up against the leg and contain what the core has not absorbed yet.
They only work when they are on the outside. If they are folded inward, under the diaper, they are not a barrier at all, and worse, they act as a wick carrying liquid straight out to the clothing.
Pampers publishes this instruction itself. Per this site’s record of the 2026-08-24 read, its own guidance is to “untuck and smooth out leg cuffs during every change.” Not occasionally. Every change.
The habit is simple: after fastening, run a finger all the way around each leg opening and pull the ruffle out. Two seconds, both legs, every time.
This one step resolves a large share of leg leaks with no other change at all, which is why this site has a whole page on it: cuff flipping and the leg ruffle trick. If your leaks are at the thighs, why diapers leak at the legs is the fuller diagnosis.
The tape angle, which no US box mentions
There is a refinement that US brand pages do not carry, and it is worth knowing because trying it costs nothing.
Kao, which makes Merries, publishes guidance on the angle at which the tapes are fastened, not just where the waistband should sit. Per this site’s record of the 2026-08-24 read: for a back leak, raise the back panel higher than the front and “fasten the tape diagonally downwards”. For a tummy leak, the mirror image. And for leaks that happen after a child has been strapped into a seat, fasten “at a lower level, slightly slanted at an angle”.
Two caveats that travel with this everywhere. That is Kao’s guidance for Kao’s taped products in the market Kao writes for, and it is not a claim about any other manufacturer’s diaper. And it is a technique rather than a purchase, which is exactly why it belongs before any decision to change product.
If your leaks are specifically at the back when your baby is lying down or in a car seat, diaper leaking at the waist or back covers that pattern.
Common mistakes, quickly
- Fastening before positioning. Do the front panel and the direction first.
- Tabs at different heights. Twists the diaper and opens one side.
- Too tight. Leaves marks and flattens the cuffs.
- Too loose. Gaps at the leg, which is where the leaks come from.
- Skipping the cuffs. The biggest one.
- Not letting the skin dry.
- Putting a diaper on over clothing that is bunched underneath, which pulls the whole fit sideways.
- Reaching for something without keeping a hand on the baby.
When good technique is not enough
If you are doing all of the above and it still leaks, the question moves from technique to fit or to timing.
Fit is the size and shape question, and the diaper fit and leaks guide is the starting point.
Timing is a saturation question. A diaper that is genuinely full when it leaks is not a technique failure; it needed changing sooner, or the night needs a different approach.
One thing worth knowing before you start comparing products for either reason: on 2026-08-24 this site checked both major US brands for a published absorbency capacity, and neither publishes one. The same check found no US consumer line publishing a rise, a back waistband height or a leg opening measurement. There is no specification to choose by, which is a good argument for exhausting the free fixes on this page first.
The short version
- Set up first and keep a hand on the baby. Never turn away.
- Clean diaper underneath before you unfasten the dirty one.
- Front panel up properly, position before fastening, tabs level and snug.
- Untuck both leg cuffs every single change. Pampers says so itself.
- Smooth everything. Bunched material is a gap.
- Try the tape angle before you try a new brand.
Author Profile
-
Saima Mostari is the founder and author of BelovedTots. She has raised two young children, Pona and Ruku, and spent years working in child development at Neurosparks, a therapy center that provides Speech Therapy, Occupational Therapy, and ABA Therapy for children with developmental needs.
It was there, watching long therapy sessions get interrupted by leaking, ill-fitting diapers, that she began researching which products actually perform under real-world conditions, not just on the packaging.
She holds a Master's in Psychology and Guidance from the University of Dhaka, and brings a behavioral observation lens to every product she reviews. When she's not testing diapers or writing guides, she's probably negotiating bedtime with a 4-year-old.
Latest entries
- September 30, 2026Diaper Brands and ComparisonsLuvs vs Pampers: P&G’s Budget vs Premium Line
- September 27, 2026Diaper Brands and ComparisonsKirkland Diapers vs Huggies: What’s Different in 2026
- September 26, 2026Diaper Brands and ComparisonsKirkland Diapers Review: What Costco’s Diaper Is Now
- September 24, 2026Diaper Brands and ComparisonsHuggies Little Snugglers vs Snug and Dry: Which Fits?